Showing posts with label Camping Equipment and Gear. Show all posts

Tuesday, June 7

Tent Buying Guide

Tent Buying Guide

A tent is the most important piece of camping equipment you will ever pack for your adventure.  Whether hiking in the mountains, a weekend at a Big4, 4WDing on Fraser Island or taking the family to a bush campground, you will need a good tent to bunker down in if the weather turns.  A good tent will protect you from the weather, insects and even wild animals.  It can also be used to protect your food and other gear.


There are many types of tents and they have many features.  Some may be relevant to you and others not so much.  Give some thought to what type of camping you will be doing, where and how often.  A good tent when cared for and stored properly will last you 10 plus years easily. It is also important to remember that a sleeping bag is what keeps you warm, not your tent.


We can’t cover all the aspects of tents and their varieties in one feature, so we will only focus on the primary aspects:

  • Ventilation
  • Price
  • Size
  • Fabrics
  • Weight
  • Types of tents
    • Swags
    • Domes
    • Geodesic Domes
    • Cabins
    • Fast Pitching Tents
    • Roof Top Tents
  
Ventilation is probably the single most important feature of a tent to look at. Ventilation controls a tent's waterproofing, temperature and reduces condensation.  For the last reason, it is important to allow some ventilation in your tent.  Different degrees of ventilation can be achieved through utilising the vents and netted windows.  Closing or opening some, or all of these will result in different ventilation of your tent.  Ensure you have pegged out your tent properly and left a gap between the inner tent and fly, or you can expect to be wet in the morning! 

The degree of ventilation you require will depend on the environment you camp in. If you do adventure camping in cold regions, less ventilation is best as you will be warmer and more waterproof.  However, the average Australian camper will most likely prefer greater levels of ventilation.

The Anatomy Of A Tent
The anatomy of a tent.  Many features often escape the untrained eye!

Price is usually what controls our choice.  Thankfully, there is a great array of good quality, budget tents on the market to suit all types of camping.  It is important to note that some of the less expensive tents are only suitable for nice weather camping.  They'll cope with mild rain and wind, but anything heavier could push them beyond their design.  These tents will suit the average weekend campers or festival goer.

If you are planning extended outback Australia travel or North Queensland trips, where you might need to ride out big winds or heavy rain for a couple of days or more, you may find it better to stretch the budget a little further.  Most of the better quality tents should hold up without any problem at all and are usually well worth the money.

Tents range in price from $50 - $1,200 for a basic tent set-up.


Size is the next thing you will need to consider.  Are you camping solo, with a friend or is it for the family?  If so, how many adults and children?

Double Swags are great for a couple or even a single person traveller looking to have a bit more room.

If you are camping solo in your tent, you will want something lightweight, easy and fast to assemble but strong and durable.  A 2-man will house you and your gear.


2 man dome tent
Many of us start our tenting lives with a simple 2-man dome.


If you are heading into the mountains or snowy regions, you will not want extra space inside your tent. Smaller tents are usually warmer, so remember to keep a vent open so you don't create too much condensation.


Extreme adventure is a pretty involved topic as weight, pack weight, extreme cold and wind, waterproofing, pole construction and many other things come into play.  When carrying a tent on your back, different considerations are relevant, which would not concern most campers.  These aspects may encourage you to spend the extra money to buy a good quality hiking tent This topic is worthy of a feature of its own.


hiking tent design features
Hiking tents are designed to be lightweight and easy to assemble,  often sacrificing in space and features.

If you are simply looking to solo tent in a Queensland bush campground, you can go to a basic 2 -man tent or a  swag.  If camping in an Australian summer, you may even want to go to a 4-Man, simply for the additional air and ventilation, not necessarily for space.


If you are car camping and sharing with a friend or partner, you will want at least a 4-man tent.  When a tent says it is a 4-man tent, it means that when you lay 4 sleeping bags on the floor of the tent, they will cover most of the floor space.  4 people in a 4-man tent will definitely mean climbing over the top of other people to get out and will leave absolutely no room for gear.  I would suggest that a 4-man tent is suitable for 2 adults and their gear.  They will be very comfy.

If you want extra space to keep your esky and kitchen supplies than you'll require a good vestibule or you will want to go to the next size which is a 6-man tent.  This will give you the added storage space.  You could also buy an inexpensive 2-man tent to keep your esky, food and kitchen bits and pieces in.  It would also be a great place to store firewood so it stays dry.

If you are a family, I would highly recommend a tent with rooms.  A 6-man tent will house 2 adults and 2 small children comfortably but your growing family will outgrow your tent quickly.  Rooms also give you added privacy and allow for your family's growth.  Once children are old enough to have their own tents you can create a tent village.  Teenagers will likely prefer and appreciate this independence.


Multiple room family tents are popular with young families in particular.   


Fabric composition of your tent is also worthy of a noting – both the upper portions and the floor tub. The upper portions of most tents are made with either canvas or polyurethane coated fabric. Canvas is much more durable and it allows heat to escape, but it is much heavier and more expensive. Polyurethane coated fabric provides waterproofing and makes them strong, durable and lightweight in comparison to canvas. As a result, most dome tents are made out of this fabric. The quality of the polyurethane is exceptionally good these days and the products are long lasting – maybe not as long lasting as canvas though. The things that really come into play when you choose between the two fabrics is whether you can afford the weight and price. If you can, the investment in canvas is well worth it and will potentially see that you have a resalable product in the future.


The fabric and construction of the floor tub is critical.  Check to see that it is of good quality and that it will keep the moisture out.  Anyone who has been in torrential rain whilst camping will understand - it's the difference between all tent contents being soaked or being able to go inside and read a book in comfort while the storm passes.  Many of the newer models have heavy duty PVC waterproof flooring and come up at least 5 or more centimetres from the ground.  You can’t go wrong!


Weight of a tent should not be overlooked.  If you have someone to help you get your tent up and down from the roof of the 4WD, or help to carry and erect the tent, this may not ever be of concern.  It is also noteworthy, if you’re pushing the weight restriction of your vehicle.  It is safe to say that some of the fixed frame and canvas tents do lean a bit on the heavier side but the quality and durability of these tents is most definitely superior.  In saying that, the quality of the polyurethane flies and aluminium poles in some of the domes are of exceptional quality and it is hard to believe that these lightweight tents can be as strong and long lasting as they are.


Types of tents Swags, Dome tents, Hiking Tents, Cabin Tents, Fast Pitching Tents, Roof Top Tents.  This article only covers a few.  So many choices!

Swags these days range from the traditional canvas bag style to double swags with stretchers underneath them which is why I included it in the tent options.  Some are nearly as big as a tent, with enough room to sit up.  I am a huge fan of the swag for touring. Nothing better after a long day of driving and exploring, than to simply unclip, roll it out, pitch a pole (or clips depending on brand) and lie down.  They are definitely worth checking out.


Dome Tents are by far the most resilient tent.  The design provides for wind to roll straight over and rain to roll off.  Dome tents generally have flexible poles which crossovers at the top and give it strength.  They are easy to pitch, light and durable. Domes come in all shapes and sizes, including single rooms, single room/vestibules, multiple rooms, and awning add-ons, which are great if you don’t want to pitch tarps or other shade structures.  As a result, they are highly suitable for a single person, a couple or a large family and are by far the most versatile tent.


Geodesic Dome Tents (sphere like dome) refers to a tent that has criss-crossing poles, forming triangles in the frame. These tents are even more stable than the standard dome and well suited to extreme weather conditions such as on mountains or windy, exposed areas.


Cabin Tents are another great option for the couple or family.  Cabins are large and spacious, with plenty of room to stand up.  They tend to feel roomier than a dome because the straight walls and the larger windows give the cabin a homier feel.  They are a little more involved to pitch, so more suited for longer stays.  The cabin is often made with heavier fabrics, thus, can take a little longer to dry out than the standard dome.  This also makes the cabin a bit heavier and bulkier so if you are planning on putting it in the car, it is handy to measure the car and note the pack length of these tents.  But if 'home-away-from-home' is what you are looking for, then this could be the answer.


Fast pitching tents are by far my favourite because I am usually pitching them by myself.  The real difference between these tents and other types is the attached frame.  Pull your tent out of the bag and push the legs up or out, depending on the brand.  Presto, it is up!  Due to the ease of assembling these tents, they are often referred to as ’30-second’ or ‘2-minute’ tents.  However, this time does not include adding the fly (if required) and/or pegging the tent down.  Most of these products have numerous awnings and extras you can add if you choose.  Some don’t require any extras to be ready for a quick roadside stop though.  I regularly don’t peg out my tent when camping for the night, which is great if you are touring.  It is free standing as long as the weather is not giving me grief.  Some would say fast-pitching tents are not as strong in strong winds.  I would never say anything could beat a dome but, by geez, I have been in some pretty cyclonic winds and not had any problems.  Once again, it is important you note the pack length of these tents if you are wanting to throw them in the car.  Most will fit fine but some of the larger may struggle and need to go on the roof.  It is at this point you might need to revisit the weight aspect.


The Oztent is one of the traditional fast pitching tents.  Often referred to as the 30 second tent.


Roof Top Tents offer heaps of advantages and especially suit the harsh Australia environment.  If you are chasing that elusive breeze, want up off the wet ground, away from the crocs and snakes; and want to wake to a view as far as the eye can see, this is the option for you.  Not the least, all that extra space in the car.  The basic overnight set up is really easy and your bed is already made.  On the negative side, if you need to move the car, you have to pack it up.  Most folks simply make sure they have done everything before they set up.  They are simple to put down and break camp.


The roof top tent is fast becoming the go to tent for many tourers.

When I did the Cape, I spoke to many folks with rooftop tents and most were very happy with them, especially when others were jumping at things that went bump in the night.  A factor that may be relevant to some, is that you may not want to remove them after your camping weekend.  If you are like me, you will never get that much height in the garage and I would not want to be taking it off regularly.  For those that have the space or are touring, they definitely have their appeal.  Personally I think they are a fantastic touring option but not as good for long-stay camping.

There are lots of other features to look at when deciding on the right tent ie types of poles, guy ropes, zipper construction and many add on features for various tents.  We have only touched on the primary aspects in this article, so keep posted for more.

Please if you need help choosing your next tent, feel free to give us at Tentworld a call, email, live chat or drop into your local Tentworld Camping Store!

Monday, October 19

Coleman Gold Series Instant Up Tent Maiden Voyage Review

By Jo Kopelke of Camping Queensland.

I took my new COLEMAN GOLD SERIES INSTANT UP for its maiden journey on the weekend.
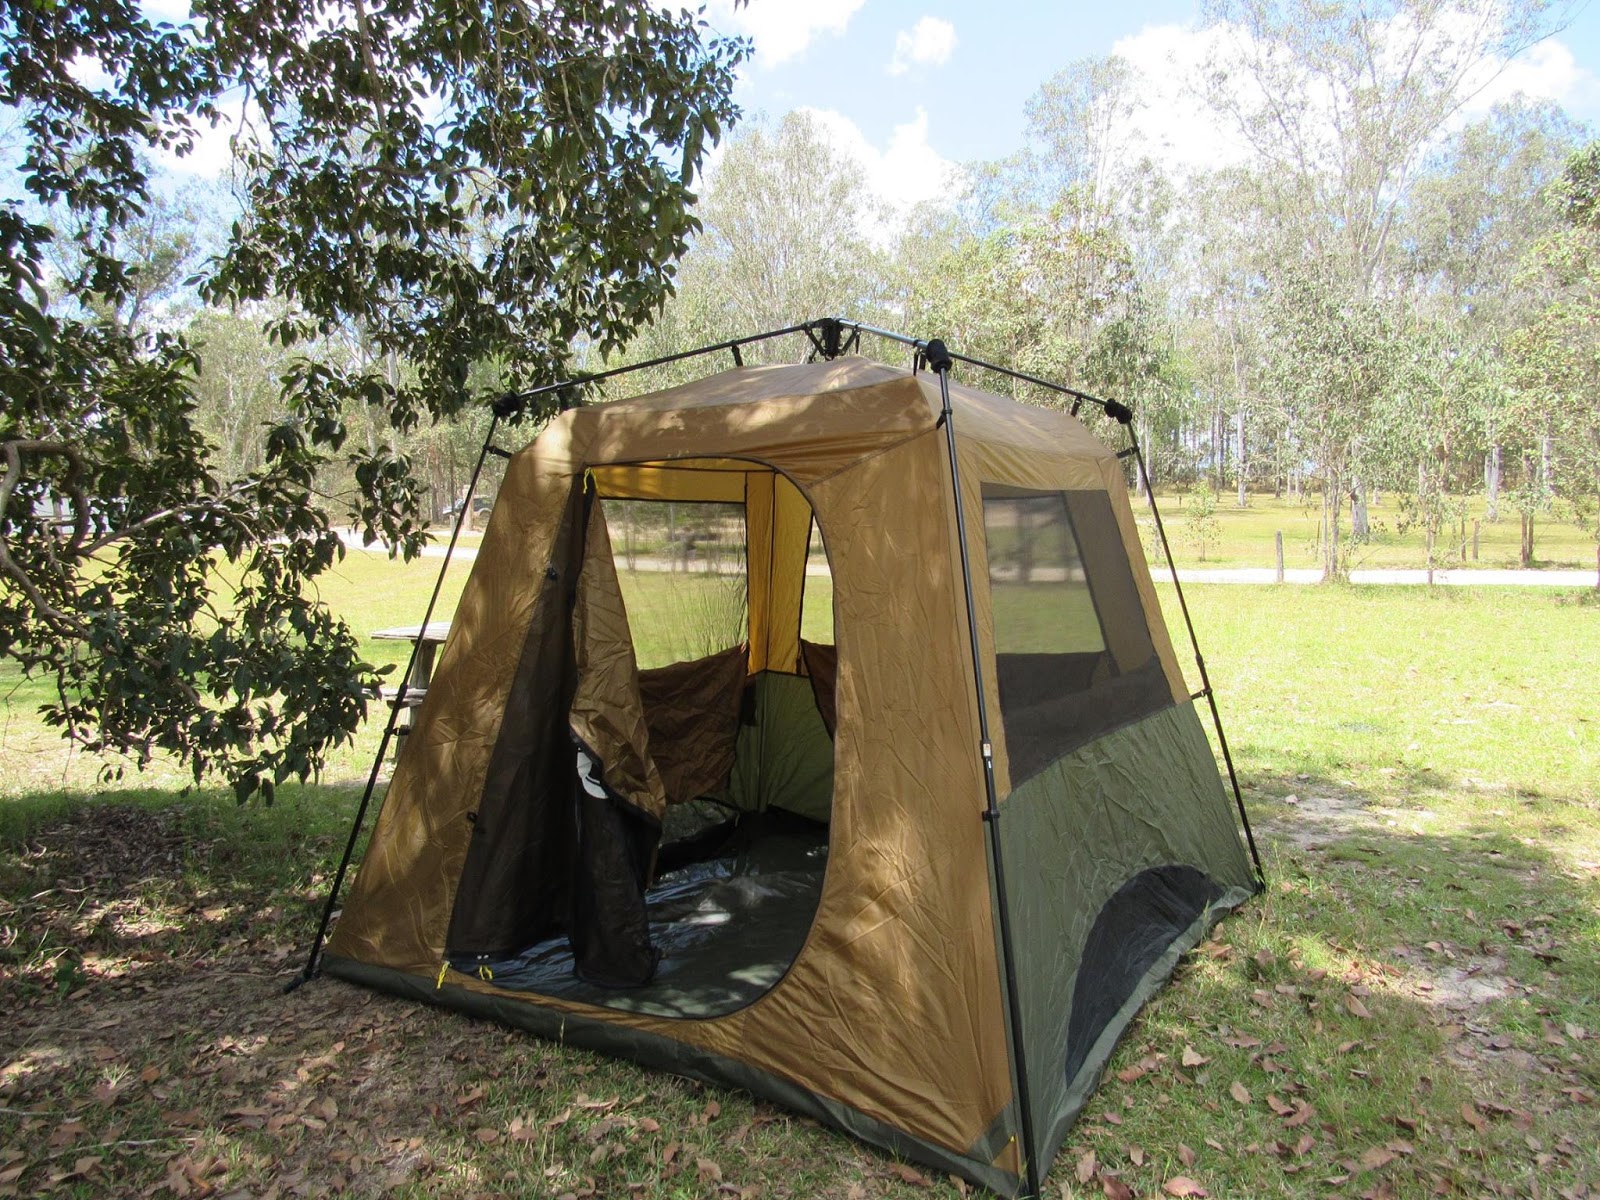
My new Coleman Gold Instant Up 4 tent in the wild.
Very impressed with the new heavy duty polyoxford PVC flooring. Feels nice underfoot. There was a fair amount of dew around this morning. I was expecting it to need some sun. Alas, not so much as drop of condensation inside or moisture underneath at pack up. I usually find drying off tents the most time consuming part of packing up after camping. This was a breeze this morning.
Pitching my new Coleman Gold Instant Up 4 Tent
With all the new features, my very favourite is the thicker and heavier fabric used in the fly. It was so much darker inside. So much so, I slept till 7.30am. I could get used to that.

The instructions say it requires 2 people to erect. I disagree. 


I always put my old model up by myself. 


This model is fundamentally same design. But in saying that, the thicker, heavier fly fabric makes it a little harder to use the wind to pull the fly over the top. The Instant Ups are quite tall and dragging a fly over the peak is a chore if you don’t have someone to hold the far side in place. I struggled with this for about 3 mins. Walked around it twice, then decided to drop the 4 corners back down and put the fly on whilst it was down. I then erected it again and it was easy as. Done. You can easily have this tent up in 2 mins by yourself, if you remember this tip.

The Coleman Gold Instant Up 4 tent inner fully pitched,  hold this space!  It goes down again in a moment.
Lowering the framing on the Coleman instant up 4 gold tent makes it easier to get the fly over on your own.
The only complaint I ever had with the standard Coleman Instant Up 4 model was no lower level ventilation. The new model has 2 extra air flows, plus the front door. Perfect for those sultry summer nights when every bit of air is precious.

The carry bag on the Coleman Gold Instant Up 4 tent is heavy duty, and very large making pack up easy. 
The flys now been thrown over my instant gold 4 tent, now just need to peg it out!
Pegged out!  Just about time to relax,  just the guy ropes to go.
The other bonus is the heavy duty carry bag. It is huge. I was able to lay the fly on the ground, place the inner on top of that. Roll it all up and throw it in the bag. I didn't even have to push little bits into corners; whilst attempting to pull the zipper. Nothing worse than taking longer to put a tent back in a bag, then it took to erect and pull down combined.
Drove away from camping feeling pretty pleased with my new purchase 
smile emoticon
I chose the Coleman Gold Series Instant Up 4 but they are also available in 6 person & 10 person.
*Coleman Gold Series Instant Up design - sets up in under two minutes
*Front door can be pitched out as front awning with two poles (included)
*Detachable oversized 3 pole (included) awning which can be attached to both left and right sides (so you can follow the shade)
*Coleman Circle Ventilation for added air flow
*Integrated internal storage hammock and organisers
*Power cord management system
*Convenient welcome mat to help keep tent clean and dry inside
*Heavy duty carry bag
Fabric:
75D/ 185D Polyester rip-stop inner
3000mm PU fly
Heavy Duty Polyoxford PVC flooring
Frame: Steel (includes 5 awning poles)
Weight: 12.7kg
Size: 240w x 240l x 190h cm
Side shot of my Coleman Gold Instant Up 4


Thursday, August 14

Zebra Stainless Steel Billy Review: Great quality and long lasting!

Written by:  Jess Crisp traveller and blogger at Red Dirt Roaming

If you have ever been inside a quality camping shop you would have seen Zebra brand stainless steel Billy's. Zebra have a very good, justified reputation for making quality gear. We have been using our Zebra Camp Kettle for 10 years now & since we have been on the road have used it everyday for the last 5 months.  
Our invaluable Zebra Camp Kettle performing in the outback! 

What we like about our Zebra Camp Kettle
It is tough. After 10 years it is still going strong. We boil our Billy over a fire whenever we can, so it has been subjected to a lot of heat. We thought that the knob on the lid would of melted by now due to all of the heat, it does have a few cracks in it, but still works perfectly. 

We also liked these features of the Zebra Camp Kettle.
  • It can be used on a variety of heat sources - fire, gas, butane, stove top. 
  • It holds a decent amount of water. We use our Camp Kettle Billy only to boil water for hot drinks & make our tea straight in the Billy. It easily serves 4-6 people when full. 
  • It holds it's heat well once boiled, meaning you can always have that second cuppa on a cool morning!
  • The pouring spout of the Camp Kettle makes them much more functional & safer for pouring hot drinks while camping. 
Zebra Camp Kettle
A brand new shiny Zebra Stainless Steel Kettle - ours looks a lot different now!

What improvements could be made to the Zebra Camp Kettle?
The only thing we don't like about our camp kettle is that the handle of the Billy won't stay in the upright position. When it was first purchased it did, but after all of the use the rivets on the handle have worn loose & it falls from the upright position. By leaving the handle in the upright position while boiling the Billy it doesn't get as hot, so pouring the Billy is easier. We just make sure we use a pair of welding gloves to combat this issue. So an improvement would be to have tighter rivets on the handle of the Billy. 


Purchased all those years ago we paid about $50-60 for our Zebra Camp Kettle, although now you can find them at Tentworld for half that price, making them a very affordable part of your standard camp kit. Are they worth the extra money compared to cheaper Billy's you see on the market? In our opinion definitely yes, they are high quality Billy's that are made to last years of camping adventures. 

What piece of camping equipment do you own that you would never do without?  Let us know in the comments below! 

Monday, July 21

My New Tent: OZtrail Breezeway 3V

For the last few years, I've been doing all my camping in my Blackwolf Turbo 210 Canvas Tent.  This tent has been great for me, and is super easy to pitch and very spacious but it has some limitations.

Last year I bought a boat to do some camping with.  Up until now I've done my camping in my Landcruiser and previously a Commodore Ute so I've never been too shy of space.

My Blackwolf Turbo 210 setup at Atkinson Dam.  Camping near the water has always been a favourite of mine, even before I got a boat!
Unfortunately,  my recently purchased boat does not have as large an area to store camping gear as it cant be stacked as well or as high as it could be in the Landcruiser.  The items I needed to pack from largest to smallest were: Blackwolf Turbo 210 Tent,  Waeco CFX-50 Portable Fridge,  Blackwolf Mega Deluxe Mats x 2,  Coleman Pilbara C-3 Sleeping bags,  Coleman Event 14 Deluxe and then Engel Smart Battery Box.

For me,  sleeping comfort is most essential so the Blackwolf Mega Deluxe self inflating mattresses couldnt be downgraded.  The Waeco Fridge is not really able to be reduced down in size as it's needed for food and very important beer!  Besides,  it's already much more space efficient than an icebox.  The Coleman Event 14 is a very efficient for space shade shelter, and the group I was going camping with were planning on using this for the long weekend so it couldnt go.  The Engel Smart Battery box is required to run the Waeco fridge as well as my CampEzi LED Strip lights so the only real target is the tent,  after that things get real serious!   

OZtrail Breeway 3v tent at Stradbroke Island
My new OZtrail Breezeway 3V tent on its first run at Stradbroke Island!  
So the decision was made,  I would choose a smaller tent because once you're asleep you're just as comfortable as before and getting changed on your hands and knees is not too bad anyway.  

I've been a fan of the OZTrail Breezeway tent range for some time,  I like the new blue colouring and I really like the large windows that can be closed from inside the tent.

In addition to that you can open the windows fully if you want to reach out to pass something through the window (not sure when I'd do that, but I can!)  

OZtrail Breezeway 3V tent
My Oztrail Breezeway 3v on its second voyage,  this time on private property in Witta behind the Sunshine Coast.  
The little awning out the front of the OZtrail Breezeway 3V is a nice feature to help with keeping your shoes and other bits of gear dry that you dont want inside your tent.  

This tent is much much smaller!  It measures just 54x18x18cm,  tiny compared to my Blackwolf at 110cmx30x30 and much lighter too at just 4.8kg vs 18kgs.  

So far I've been very pleased with my OZtrail Breezeway 3V,  it will of course never surpass the Blackwolf Turbo 210 tent but when space is at a premium this tent does a very nice job and offers some nice comforts.

Wednesday, July 9

OZtrail Deluxe Gazebo at the markets, and sports events.

If you've been to the markets lately, you would have noticed that they're swamped in OZtrail Gazebos.  Mostly OZtrail Deluxe 3x3 Gazebos.

The very popular Oztrail Deluxe 3x3 Gazebo.
There is a good reason for this.  They're made from strong materials,  they're repairable and they have a wide range of gazebo accessories and different styles of walls available too enabling you to customise your setup to suit your needs.

The OZtrail Deluxe 3x3 weighs 27kgs and when packed away measures 160x35x30cm so it is definitely no small object.  OZtrail fortunately have tackled that problem head on and included with the Deluxe 3x3 gazebo a wheeled carry bag.  Allowing a single person to move the Deluxe 3x3 with ease.

Setting the Deluxe 3x3 Gazebo is easy enough on your own, but to make it easier it does help to have a friend.  The best way to do it is to open the frame up 3/4 of the way, then throw your canopy over the to and place in its correct position.

Once you've done this,  extend out your Deluxe 3x3 until it's locked into position.  You can now locate the gazebo in its final position.  Hammer pegs through the legs, and extend the gazebo to the height you desire.  Be sure to use the guy ropes attached the fly incase a large gust of wind comes through,  these can pick up the gazebo if they're not adequately secured as if it was an umbrella!  It can be very scary.

If you're looking for a Gazebo to take camping,  I would recommend you consider the Oztrail Standard Gazebo.  

The OZtrail Standard Gazebo is the perfect choice for the camper.
Dont be deceived by its name,  this gazebo is in my opinion the perfect choice for camping.     It weighs less than the Deluxe 3x3 at 20kgs,  is 135x22x25cm vs 160x35x30cm making this gazebo much easier to handle, store and lift if necessary.  Especially important if you're planning on storing your gazebo on the roof of your car!  

The frame design on the Oztrail Standard Gazebo operates differently to the Deluxe Gazebo.  Instead of having a pole that extends from the centre to the peak the poles extend from each corner to the peak.  This design means that the gazebo is less prone to pooling water in a heavy down pour.

Best of all though,  the OZtrail Standard Gazebo is compatible with all of the OZtrail Deluxe accessories such as the tent inner kit (converts your gazebo into a tent),  screen house inner kit (converts your gazebo to a screen house!),  screen walls,  solid walls,  walls with zips etc.

Setting up the OZtrail Standard Gazebo is the same process as the Deluxe Gazebo.  Best practise for it, and the Deluxe Gazebo is to remove the canopy when you pack it away.  Failure to do so may mean that the frame may pinch the material,  not a good move for keeping a water proof gazebo!

Click these links for more information about the Oztrail Deluxe 3x3 Gazebo and the OZtrail Standard Gazebo.


Tuesday, June 24

Camp Stretcher Pros & Cons 3 reasons why, and why not!

Should I get a stretcher for camping

A commonly asked question,  with no set answer.  A stretcher can be a great addition for some campers, and a terrible idea for others.  Below we explore a few reasons why they're great, and some of the reasons why they're not great. 

1)  Increases storage space.  By using a stretcher you can store your bags,  valuables and other personal belongings underneath your stretcher.


The OZTent King Goanna Stretcher bed is a popular choice and leaves plenty of room available beneath for some storage.
2)  Gets you off the floor.  This is especially important if you're not camping inside a tent.  If you're sleeping under a tarp and it rains it's not impossible for water to run along the ground under your bed. Generally tents have a water proof floor so this is not so much of an issue then.  Some people like to get off the ground with the theory that it helps you keep away from bugs etc.  This is not so much of an issue either when inside a tent, but could be useful under a tarp.

3)  Easy to get in and out of.  Being off the ground really helps with getting into, and out of bed especially if you've got a bad back, knee etc.

For some people, having a stretcher just does not work.  Here are a few reasons why:

1)  Less weight -  A good thick self inflating mattress on the ground is extremely comfortable,  this allows you to do without your heavy stretcher.

2)  Save space - Following on from less weight, a self inflating mattress such as the Blackwolf Mega Deluxe Self Inflating Mattress is very comfortable on its own.  Adding a stretcher increases the amount you need to pack.  Space is often precious when packing your car and trailer!

3) Not great Queen beds - your typical queen stretcher is not great.  Queen stretchers, in order to make them useable at all need to have a bar down the middle.  This can make bed time cuddles and spooning a little uncomfortable.  This can be somewhat overcome on the OZtrail Queen Easy Fold Stretcher by using a OZTrail Queen Leisure Mattress on top.  However it does not eliminate the bar entirely. 


The OZtrail Queen Easy Fold Stretcher is a great double stretcher, but has a bar running down the middle which can make cuddle time unpleasant.  To overcome, combine with an OZtrail Queen Leisure Mattress


There are other stretcher like beds available such as the OZtrail Queen Instant Anywhere Bed it overcomes this problem using a inflatable mattress on top.  Though for many having a standard inflatable mattress is not ideal, due to the trampolining effect that they have.  ie - your partner moves, and you then move because of them.


Wednesday, February 26

3 reasons why you should buy a Blackwolf Turbo Tent!


Blackwolf Turbo tents have been becoming more and more popular in Australia and many positive reviews, and recommendations can be found in any popular Australian camp ground or forum.
The Blackwolf Turbo Twin 300, is a very popular model in the Blackwolf Turbo Tent range.
This is for three main reasons

1:  Quick to setup, and pack away.

Appropriately, this is the number one reason why people choose the Blackwolf Turbo tent to be their camping companion.  These tents are quick to setup, giving you more free time to do the things you enjoy when camping.  Think relaxing around a campfire, or exploring the area around you!

See this video to see how easy a Turbo tent is to setup!


2:  Simple to setup, and pack away.


You'd kind of expect that a tent that's easy to setup, is easy to pack away.  That has not always been the case, but is definitely true with the Blackwolf Turbo tent!

See this video on how to pack up your Blackwolf Turbo tent!


3:  Made from tough, durable materials and backed by an lifetime warranty.  You're buying quality.

Whether you're buying the canvas turbo tent, or the lite range made from heavy duty polyester you're buying a high quality, tough tent that will look after you for many years to come.  To guarantee this, Blackwolf have backed their product with a lifetime warranty!

If you've got any more questions about the Blackwolf Turbo tent range and if they suit you, get in contact with Tentworld - The Camping Experts today!

Monday, February 17

My Overnight Camping Gear Setup (Checklist)

Written by Traill Howman, a passionate camper and full time Tentworld staff member.

My Camping Setup if heading away for 1 night.

If my wife and I are just going somewhere for one night we like to keep our setup and packdown time to a minimum yet with enough creature comforts to make it enjoyable.  We also look at the size and weight of things so that it's easy to carry everything from our vehicle to non car-camping spots.  It's always a work in progress as each time we go for an overnight trip we look at how it can be made easier and therefore more enjoyable.

This is the setup we have at the moment:

Malamoo 3 Second X-Tra Pop Up Tent (3 Person)

The Malamoo 3 Second Extra Pop Up Tent (3 Person Tent)
This tent is an absolute breeze to put up - simply take it out of the bag & let it pop up!  It already has the inner lining attached to the waterproof fly so you don't even have to worry about throwing a fly over your tent & pegging that down separately.

The inner lining is breathable so it provides great ventilation whilst still preventing condensation build up in cooler weather. Large windows all round also means that you will remain cool in warmer weather & the side windows are designed so that you are still getting ventilation even when it is raining thus helping to prevent condensation build up (which is often mistaken for a leaking tent in wet weather).
I only wish the Malamoo Mega tent had been out when I was buying my overnight tent!

I personally got a lot of practice popping up & packing this tent away at last years October Camping & Caravan show when doing demo's for customers – it really is a mega sized pop-up tent!

Whilst we squeeze two king-single Oztrail Leisure mat's into the X-tra with only the small vestibule & excess room around our feet for gear this tent provides plenty of room for your mattresses & a large vestibule area for stashing your gear out of the elements. It also packs down into a flat disc about the diameter as the X-tra due to an extra fold when packing up! 


These tents are great time-savers – if the weather is going to be fine & not too windy I'll just put about 8 ground pegs in & be done with it! If it's looking a bit windy or like rain I'll put out the attached guy ropes too. All in all it'll take me about 5 minutes at worst to set up my tent!

Our Bed


As I said before, we use 2 king-single Oztrail Self-Inflating Leisure mats. We've had an inflatable mattress before but after an unpleasant experience with a slow leak one night, plus the fact that I'm a lot heavier than my wife and was sending her bouncing all over the place every time I turned over - we decided to go with this option. 

The OZtrail King Single Self Inflating Leisure Mattress, a great choice for car camping!
The self inflating leisure mats are great for a number of reasons – you will never end up on the floor, even if you do manage to puncture your mattress, you don't have to blow them up – just undo the bungs & the hard work is done for you & they are very comfortable with the foam inner providing great support.

When put together these two mattresses are actually the same size as a regular queen bed – so we just use a fitted sheet from home and it works perfectly.

We chose to go with 2 King mattresses as opposed to 1 Queen size for a number of reasons: Ease of packing – it always seems easier to fit in a number of small items as opposed to one large item. Flexibility – if just one of us is going away we don't have to take a large queen sized mattress. No bouncing! I can flop around to my hearts content without disturbing my wife's sleep & I'm sure we've all heard the saying... Happy Wife = Happy Life!

Sleeping bags

Oztrail Explorer Campers for warmish to cold weather & Coleman Pilbara C5's for warm weather. As far as I'm concerned you can't go past the comfort & quietness of cotton outer sleeping bags & we normally just open one out and use it like a doona with a spare incase it gets a bit cold and we want to put it underneath us, join them together if it's still cold or just sleep in our own if it is really cold.

Pillows


Old faithful's from home. Although I have been tempted by the Blackwolf Deluxe self-inflating pillow as a space saver & because they feel damn nice! They are pretty close to a full size pillow so I will definitely be looking at these down the track. 

The Blackwolf Self-Inflating Deluxe Pillow is a great choice if you're looking for a comfortable pillow, but cant afford the space needed to take your pillow from home.
Bags
I don't use any particular bag when going on overnighters.  However, I always try to ensure that we pack as light as possible but still bringing the appropriate gear to suit any potential weather conditions that could present themselves.  


Shelter - Gazebo

I normally always take a gazebo because it's always good to be able to get out of the sun or rain & they are so quick to put up or down. For an overnight stay I'll use our Oztrail compact gazebo – its super compact & light weight so it's a breeze to pack. I also always take a couple of solid walls to block off the sun or wind & 4 mesh walls incase the bugs/flies/mosquito's are bad.

The OZtrail Compact Gazebo, is my favourite because its compact!
Cooking

When cooking I will use my OZtrail Single Burner with Piezo ignition (Or I have a Butane Cartridge stove – I just prefer to use non-disposable methods where possible) – simply screw's onto my small 2kg gas cylinder & provides a simple cooking surface for a pan or my kettle for that all important morning coffee.
Frypan 
I use the Campfire 28cm round ceramic coated frypan, it has a removable handle which is handy for packing & has a great non-stick surface.

Campfire 28cm round frypan with removable handle
Kettle
Oztrail Whistling Kettle (Campfire are now producing a similar high quality offering)– simple & effective kettle – handle folds down which is great for packing, whistle's when ready, plastic handle so you won't burn yourself, & also has a plastic handle on the lid which I like because I prefer to open the lid of the kettle to judge how much water I am using.
The OZtrail Whistling Kettle is a great camping companion.
As a side note – if I am trying to preserve gas or boil water as quickly as possible for my morning cuppa – I pour the water I am about to boil into my mug before pouring it into the kettle so that I know I am only boiling just the right amount of water that I need.Washing up – 

Campfire 10L Collapsible Tub – A well sized tub for washing up that compacts nicely for ease of packing. We also have an Oztrail dish rack with drip tray for drying but if we're just going for the night we usually just leave things on a dish towel to dry.

The Campfire 10L Collapsible Tub (Sink)  folds flat for easy storage!

Cutlery & crockery

One of our best purchases! The Primus 4 person deluxe picnic set – it has everything we need packed into a small bag that also gives us room for most of the food we usually take that doesn't need refrigeration. We have only added a good sharp cooking knife in a sheath & we usually take a larger cutting board. Plus we have extra's for friends or if we're too lazy to wash up after every meal!
Primus 4 Person Deluxe Picnic Set
Water
Coleman 19L Beverage Cooler – I used to use a regular 20L water cube with a tap but after chasing the shade around all day on a number of occasions we invested in this beverage cooler so that we don't end up with really warm water on hot days. On longer trips I actually just sit this on an Oztrail aluminium stool so that it's not taking up table space but is still off the ground for easy pouring.

The Coleman 19L Beverage Cooler helps keep your drinks cold with an insulated container.

Cooling

If it's going to be hot I will always take my Companion Rechargeable Oscillating Fan – a blessing on those really still nights or mornings!
The Companion Rechargeable Oscillating Fan keeps you cool at night!
Chairs
We have an Oztrail Big Boy canvas chair & an Oztrail Monarch quad fold chair – they are both excellent, high quality chairs that take up minimal space & are easy to carry to those non car-camping spots.


Table

Oztrail Easy Table 4 – packs away into a really compact package, is nice and sturdy but provides enough room for basic cooking.

The OZtrail Easy Table 4, packs away into a bag similar in size to an quad fold action chair.

Icebox

Waeco 41L Cool Ice icebox – usually provides plenty of room for an overnight stay.
The WAECO Cool-Ice Icebox is far superior to your typical cooler bought from Bunnings & Kmart and when packed right ice will last for days!
So there you have if folks – there are a few bits & pieces not listed but I will be back soon with a copy of my "Camping Equipment Checklist" which is easy enough to tailor to your individual needs & requirements. I never leave home without going through it as it is often the most obvious things that get left behind... such as chairs. Yep, that was fun I wont forget chairs again!

Happy Camping,

Traill